Saturday, October 01, 2011


Tafe -Weeks 29 & 30.

Last two weeks of term and we had a chance to use tools again that weren't pencils or related to wax! Oh how I've missed you torch, saw and files!
Our final assessable project for the completion of our certificate was to make a ring from scratch. This was the project:
  1. Calculate and weigh out how much copper to add to 10 grams of fine silver casting grain.
  2. Melt the grains and pour an ingot. 
  3. Roll the (round) ingot into a square bar of 4x4mm. 
  4. Roll the square bar into flat stock, measure up bearing in mind that the finished ring must be exactly 4.1mm wide and 1.7mm thick
  5. Form into a ring band and solder. 
  6. Then it's to be finished to a 600 grit finish ready for marking. When it's finished our solder seam must not be visable, have no pits etc and the ring must be a perfect size L.
Work in progress with the left over strip in the background. Still some cleaning up to do.


Yay! Right width! You'll have to take my word on it that the other measurements were right too!
 The vernier calipers have been in demand these past two weeks, that's for sure! We did make a ring earlier in the year but we made it to fit ourselves and were assessed on the finish rather than measurements, so this was more of a challenge, especially when we were told that if it didn't meet the requirements we'd be melting it down and starting again! The idea behind this project is that for students seeking industry jobs, they can be sent off to their new apprenticeships and have the skills to make a wedding band to the exact standards and size as required by a client/boss. Apparently making ring bands is the most common practise in the industry! I'd never really given it much thought, but it figures!

Anyway - all done - no remelt required! :) And a bonus - the Size L fits me............. Pin It

Why it pays to save your Silver scraps!

Last TAFE lesson I melted down some of my sterling silver scraps. The years of collecting excess headpin and wire offcuts and other silver scraps has paid off. I ended up with a rather hefty ingot of sterling weighing 102 grams (just over 3.2 troy oz). I've more scraps to take in next term too. Here's a pic taken after a few turns through the rolling machine.

It's got a way to go yet before I can use it - lots of annealing and rolling to do!


Pin It

Friday, September 16, 2011

Out Cast!

Tafe - Weeks 24 -28

I haven't blogged lately so here's a rundown on the last month or so of Tafe lessons.
Our project was to design and carve a piece in wax, ready to cast.

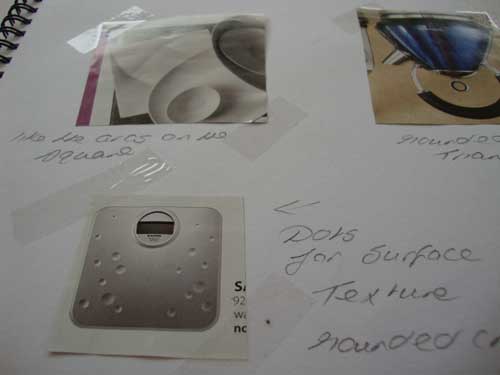
First up - research & inspiration :) After many hours of web browsing and looking through books, inspiration was eluding me! Who'd have thought that it would be while flicking through a Store catalogue junk mail that I spotted a dinner set and inspiration finally hit. The contrast of the plain square shaped plates with their lovely fluid curved profile appealed to me. Then on the next page I spotted a set of bathroom scales and loved the dots! Finally I had a starting point.....


The next step was to sketch out some designs, so the drawing lessons we did earlier in term had come in handy already. I'd come up with a couple of designs but in the end I abandoned the triangular idea (Swiss Cheese anyone!) in favour of the curved square with some dots and texture.


Next step was the tech drawings which had to be to scale. Drawing comes naturally to many people - unfortunately I'm not one of them..


Then on to the wax carving. I started with a block of Green wax and the fun began. Sawing and shaping first  then carving out the shape. My shape was much easier to form than the knot I carved out in an earlier lesson, so this step went pleasantly quickly.  Once the front surface was shaped and sanded smooth I applied the surface texture - I used a bur to make the little concave depressions and a scribe to make the scratched lines.
The thing with casting is to get the wax as light weight as possible, so the back had to be carved out so it wouldn't use more metal than necessary when casting. Also, the piece can't be too heavy to wear - the weight of a piece in sterling silver would be about 10.5 times the weight of the wax. So I set to work with a bur in a pin vise to hollow out my wax.


 The wax block is a dark bottle green - the aim is to have it looking a consistant pale translucent green when it's held up to the light.


Later I did lots more tidying, carving and sanding and the final wax weight was about 3 grams. I was really happy with the finish and so was the teacher! The better the finished wax model is- the less work needs to be done on the cast metal piece. I didn't take a final pic though as we sprung into action in the afternoon getting our pieces sprued up and into the flasks to pour in the investment, which is like a super, super fine plaster of paris.

For those not familiar with casting: the metal flask contains the wax model with the hardened  investment around it, and  is placed in a kiln to heat up - the wax melts out leaving a void in the investment. About 6 to 8 hours later the flask is removed from the kiln and the molten metal is poured into the hot investment and fills the void so the shape can be replicated in the metal! There's a bit more involved but you get the idea.

Which brings us to this week's lesson - The flasks were in the kiln and we busied ourselves drawing colour renderings of our designs..... these had to be a standard suitable as if to present to a client. Now mine doesn't look too colourful really but that's what happens when you are drawing silver!  I used 4 shades of grey and an indigo!


Still with me? A bit long winded I know, but this is the condensed version of about 5 class days!  I suspect that you will be dissatisfied with the ending of this story though!

After being removed from the kiln, a little piece of investment chipped away from inside the flask. Not sure what happened as I was busy melting my silver at the time, but it chipped in a crucial location and any silver poured in at the top would have gone straight through to come right out the bottom!
There was lots of speculation about what caused the investment to chip off - possibly my positioning of the wax in the flask (not enough clearance - don't think it was this) or my prep of the investment (hmmm - quite possibly) or it could have been no fault of mine - the flask could have been knocked going in or out of the kiln or any number of other mystery reasons.  
The lecturer tried a last ditch attempt to cast anyway by plugging up the chipped investment with wet paper towells but by the time we got the silver remelted the flask had cooled down too much and the silver just spat back up out of the flask during the pour. My casting had failed!
My piece went from  "one of a kind" to "none of a kind" in the space of a few minutes (insert sad face here)
Here's the remnants of my silver which I reclaimed from the investment and the work bench. 


Teachers and fellow students were mortified for me but on the upside, (there's always a silver lining eh? oops - excuse the pun - sorry!) I won't have to spend next week's lesson removing my sprues and cleaning up my casting!


Pin It

Wednesday, August 10, 2011

Drawn Out!

 TAFE: Weeks 21, 22 & 23.

Back at Tafe for Semester 2, we're 3 weeks in and for the first 2 weeks didn't touch a tool or a torch! Well that's unless you consider a pencil a tool!

We've been learning the practical aspects of design, particularly rendering jewellery designs with a little bit of tech drawing thrown in.

This may seem basic but it's been many years since my high school art, so it was new to me - first the basics of shading, light source etc

Then with coloured pencils

Later we learnt how to draw twisted wire and a chain


More drawing practise, this time learning the best colours to use for rendering in gold & silver then learning the tech methods of drawing a ring to scale.


Then the pencils were put away and at last some tools came out - hmmm, wax carving tools. And now for the piece that took a day and a half out of my life!!
The cord piece was the model and we had to carve a 3D model of the knot from a block of wax. I found this incredibly difficult and it was a great relief to finally finish it, having confirmed my suspicion that I'll never make the cut as a sculptor!


Pin It

Wednesday, June 29, 2011

Halfway There!

Week 20 Tafe:

I can't believe we are halfway through the year and the first semester is over already at TAFE. This week we were free to finish things off or do our own projects.

I did an anticlastic bangle. I don't have the right stakes or the right hammers to do this at home but wanted to have a go. It involved lots of  noise & hammering for most of the day and I went home with an aching arm....but I also went home with this - a  brass cuff. It's about 3.5 cm wide.The colour is from the constant annealing but I rather liked it so I just sanded and buffed up the edges for contrast and I'll just leave the oxidisation.


Towards the end of the day I made this open brass bangle. This was quick and simple as I cut it out with the guillotine. Now that would be a luxury to have one at home *dream*, then I drilled the holes quickly with the flex shaft. I got to use an oval steel mandrel which was a change  - at home I just have a very basic round wooden mandrel.
Now - 3 weeks break before the second semester. Hope to get a little bench time at home while we're on break. Pin It

Sunday, June 26, 2011

Lost Claws

Week 18 and 19 TAFE:

Sunday I attempted to re solder my bail to my claw setting. I did everything right and made a successful solder join........except the bail was a little crooked.......aargh - after I'd spent ages fiddling around to set it up, it had looked pretty straight to me pre flame!  So, I reheated to unsolder to start again, which worked fine........until I put it in the pickle and that's when things started to go downhill - the CZ went cloudy! Damn!
With nothing more to lose I set up to re solder it all again (maybe I could pretend my CZ was supposed to be frosted!) and that's when things went totally pear shaped! My poor little claw setting said "enough is enough" and melted.....right before my flame! (Actually it just popped apart - like a mini explosion)


This kind of wrecked my weekend. I sulked, I whinged about nothing going right - In short I transformed into a drama queen - but the upside is the family gave me a wide berth and my husband cooked a nice roast dinner that night! (there's always a silver lining - right?)

 I dragged my sorry arse to class and told my sad tale to the sympathetic teacher with some embarrassment. She gave me the choice of remaking, working on some other exercises or working on my own projects for the day.***.  Initially, I was all keen to remake but gave up on that idea after a few more frustrating hours. Instead I played with brass and the sandblaster. Now that was more fun!


*** Wondering why the teacher didn't make me complete another claw setting? Well, this is a pre apprenticeship level course and completing a claw setting was an extra project the teacher gave a few of us to stretch our skills - so it's not actually a requirement of the course, although it will be a personal challenge for me in the distant future :)
Despite the occasional frustrations above  - I'm still enjoying the course..... really  :)


Pin It

Saturday, June 18, 2011

Brassed Off!

Week 17 TAFE:

No photos - Suffice to say, all was going well with setting the CZ in the claw setting, until the end of the day when doing the final clean up....the bail parted company with the setting....what can I say?....I did a shoddy soldering job!  :(  Hopefully I'll be able to re solder carefully to fix it.....we'll see.......to be continued.

Moving on....at home this week I made some oversized earrings from huge brass discs on Sterling Ear wires. They're 5cm (2 inches) in diameter but they're not too heavy to wear as they're in a thinner gauge of metal. I had fun texturing the metal.

'Landscape' Convex discs - Roll printed with Aluminum mesh.

'Portrait' Convex' Discs - Roll printed with textured paper.

'Portrait' Concave Discs. Hammered Finish.


Pin It

Wednesday, June 08, 2011

Finish Clasp - check!

Week 16 Tafe:

Yesterday in class, I made a little bail for my soon to be CZ Pendant. It was gonna be a little rabbit ear bail but while annealing, the edges started to melt, so by the time I filed it back it didn't leave me with much room to saw out a triangle from the middle, (plus I was sort of over it) Now it's just going to stay the traditional bail shape. It's only about 6mm in width.


This modest little finding took me about an hour to make - it was a process of measuring, marking, sawing, annealing, bending, annealing again, nearly melting, bending again and filing.
This gave me a new appreciation for the Sterling Silver bails that I already had at home. They were handmade by Balinese Silversmiths...and were extremely good value at $1.16 each! :)

Then I moved on to finish the padlock clasp. Technically, it's not perfect but it looks OK and it works! I'm happy - I'd prefer that it was perfect(he he!)but I remind myself frequently that I'm a Cert 2 student (pre apprenticeship level)I'm not doing an apprenticeship or the diploma course, and at least I now know in theory how it should be done perfectly! Maybe if there's a next time.........


Pin It

Monday, June 06, 2011

Moving on!

Week 15 TAFE:

Our teacher has moved us on to a new project. So this week we started a prong setting.
The padlock clasp hasn't been abandoned - just put aside. I quite like working on a couple of projects at once. While one project is in the pickle, I can be filing the other item or whatever. It mixes it up a bit so things don't get boring....and I'm happy to have a little break from the padlock clasp.

It was left up to us whether we wanted to do a 6 or 4 prong setting for our 6mm cubic zircona and I opted for a 4 prong setting. Yes, it was a cop out the easier option but I want to walk before I run ;)
What I find the most challenging is working on such a small scale. I realize that a 6mm stone is a decent size stone (especially if it was a diamond!) but even so, working on the setting is still very fiddly work, and I'm full of admiration for those that set teensy 1mm stones.


Pin It

Thursday, June 02, 2011

Progress report on the clasp from hell.... ;)

Week 13 & 14 at TAFE:

Both TAFE days I've been working on the padlock clasp which is proving to be a challenge. I did some work at home on the weekend and soldered the chain links of the bracelet, and while I was at it, I thought I'd just solder the top plate to the base of the padlock clasp while I was at the bench: easy peasy - a five minute job...after all it's just a variation of a hollow form and I've churned a couple out with not too many issues since I learnt the technique ......Aha! - what naive optimism - It was actually A PITA that took 4 attempts!

The top is very gently domed and there was one little section where the top just wouldn't solder to the wall of the piece, although when it was all bound up pre soldering it looked like it was all flush and connected OK. Despite me trying the troubleshooting tips from the teacher(filing & gentle hammering of the edges) I still had a tiny hairline section that just wouldn't connect!

Stick soldering saved the day - something I don't usually do because I'm not too good at this and I find that I flood too much solder on the piece when I solder this way. Anyway this time that was a good thing (yay!) and it filled the 'gap'! Now there's just this small matter of extensive firescale to address LOL!
Many jewellers will tell you that solder will not fill a gap. Bearing this in mind it's quite possible that my problem wasn't so much a gap. It may have been that the section was dirty or perhaps contaminated by pickle, which prevented the solder from flowing in that spot. Who knows? Anyway it's all fixed now!

In class I prepared the arm which I soldered on to a little hand formed tube, it had to be hardened, filed, annealed and turned up and soldered. I had to "fit" it to the body, working out the placement of the holes in the wall,which I drilled, burred & filed out ready to take the arm and be riveted in place......which is what I'll be doing next week in class!


Pin It