Showing posts with label Cert 2. Show all posts

Tuesday, July 03, 2012

Certificate 2 - Yay!

I finally applied for my certificate and now I have something to show for my time attending Tech College last year. And yes, I am going to frame it and hang it on a wall! 
This was a big deal for me, I left school the first time 40 years ago! (oops showing my age now!) so going back into a formal learning environment definately challenged me and I was often out of my comfort zone. 
I'm so glad I did it though :) 


We're heading off to Queensland this week for our 4 wheel Drive holiday that I wrote about earlier.
As it's a charity drive they'll be some fundraising auctions along the way. I'm donating the jewellery below - hope it gets some bids ;)


We'll be in some remote areas so I doubt I'll be blogging - I'll update when we return.
Pin It

Wednesday, October 12, 2011

Class countdown!

The Tafe year is nearly over for my course. I have mixed feelings - I'm looking forward to spending the time at home creating instead but really will miss the classes. And then there's the motivation issue when I'm at home - there's so many distractions: housework, shopping, washing, ironing and cooking.
I'm not saying I do them but the need to do them definately distracts me from the task of creating ;) Not to mention the biggest distraction of all - The Internet!!!
Anyway, we had a great day in class yesterday. A classmate is working on a new range and the teacher gave us all a lesson/demo in how to make a rubber mould. Jane was then able to use the mould and use the wax injector to reproduce her design in wax.

I took about 20 grams of scrap sterling in to class and melted it into an ingot then spent far too long (but I love doing it) rolling it down on the mill and then drawing it down into .8mm wire which I'll being using for earring hooks.

Another classmate Carolyn generously bought in some copper pipe for me to use for future trinket boxes. The teacher took us down to the metal workshop and we had it sliced on the cold metal bandsaw (at least I think that's what it was).
It took the metal workshop teacher a few minutes to do and will definately save me an hour, probably more of sawing. I'm always pleasantly amazed at the resources available at Tafe.

I also rolled down my ingot from last term a little more. I've decided I'll leave it now at about 1.5mm thick until I have a definate project in mind for the silver.


We also got the course info for next year. There's a possibility that we may be able to enrol in the Advanced Diploma as part time students and just do a few of the units. There's about 5 of us from this course interested in doing more.  Love to be able to do that if it fits in with all the other commitments I have, like family and the day job!

Now that the formal class projects are out of the way I have to plan what I want to do in class next to make the most of my last 3 classes............. 


Pin It

Friday, September 16, 2011

Out Cast!

Tafe - Weeks 24 -28

I haven't blogged lately so here's a rundown on the last month or so of Tafe lessons.
Our project was to design and carve a piece in wax, ready to cast.

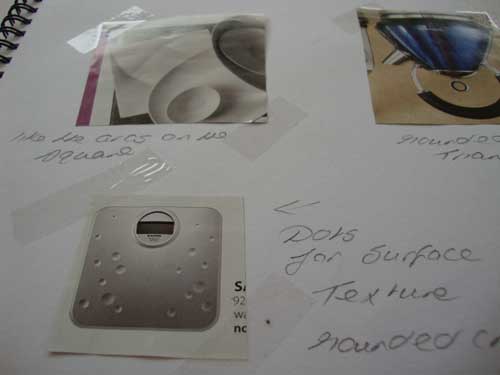
First up - research & inspiration :) After many hours of web browsing and looking through books, inspiration was eluding me! Who'd have thought that it would be while flicking through a Store catalogue junk mail that I spotted a dinner set and inspiration finally hit. The contrast of the plain square shaped plates with their lovely fluid curved profile appealed to me. Then on the next page I spotted a set of bathroom scales and loved the dots! Finally I had a starting point.....


The next step was to sketch out some designs, so the drawing lessons we did earlier in term had come in handy already. I'd come up with a couple of designs but in the end I abandoned the triangular idea (Swiss Cheese anyone!) in favour of the curved square with some dots and texture.


Next step was the tech drawings which had to be to scale. Drawing comes naturally to many people - unfortunately I'm not one of them..


Then on to the wax carving. I started with a block of Green wax and the fun began. Sawing and shaping first  then carving out the shape. My shape was much easier to form than the knot I carved out in an earlier lesson, so this step went pleasantly quickly.  Once the front surface was shaped and sanded smooth I applied the surface texture - I used a bur to make the little concave depressions and a scribe to make the scratched lines.
The thing with casting is to get the wax as light weight as possible, so the back had to be carved out so it wouldn't use more metal than necessary when casting. Also, the piece can't be too heavy to wear - the weight of a piece in sterling silver would be about 10.5 times the weight of the wax. So I set to work with a bur in a pin vise to hollow out my wax.


 The wax block is a dark bottle green - the aim is to have it looking a consistant pale translucent green when it's held up to the light.


Later I did lots more tidying, carving and sanding and the final wax weight was about 3 grams. I was really happy with the finish and so was the teacher! The better the finished wax model is- the less work needs to be done on the cast metal piece. I didn't take a final pic though as we sprung into action in the afternoon getting our pieces sprued up and into the flasks to pour in the investment, which is like a super, super fine plaster of paris.

For those not familiar with casting: the metal flask contains the wax model with the hardened  investment around it, and  is placed in a kiln to heat up - the wax melts out leaving a void in the investment. About 6 to 8 hours later the flask is removed from the kiln and the molten metal is poured into the hot investment and fills the void so the shape can be replicated in the metal! There's a bit more involved but you get the idea.

Which brings us to this week's lesson - The flasks were in the kiln and we busied ourselves drawing colour renderings of our designs..... these had to be a standard suitable as if to present to a client. Now mine doesn't look too colourful really but that's what happens when you are drawing silver!  I used 4 shades of grey and an indigo!


Still with me? A bit long winded I know, but this is the condensed version of about 5 class days!  I suspect that you will be dissatisfied with the ending of this story though!

After being removed from the kiln, a little piece of investment chipped away from inside the flask. Not sure what happened as I was busy melting my silver at the time, but it chipped in a crucial location and any silver poured in at the top would have gone straight through to come right out the bottom!
There was lots of speculation about what caused the investment to chip off - possibly my positioning of the wax in the flask (not enough clearance - don't think it was this) or my prep of the investment (hmmm - quite possibly) or it could have been no fault of mine - the flask could have been knocked going in or out of the kiln or any number of other mystery reasons.  
The lecturer tried a last ditch attempt to cast anyway by plugging up the chipped investment with wet paper towells but by the time we got the silver remelted the flask had cooled down too much and the silver just spat back up out of the flask during the pour. My casting had failed!
My piece went from  "one of a kind" to "none of a kind" in the space of a few minutes (insert sad face here)
Here's the remnants of my silver which I reclaimed from the investment and the work bench. 


Teachers and fellow students were mortified for me but on the upside, (there's always a silver lining eh? oops - excuse the pun - sorry!) I won't have to spend next week's lesson removing my sprues and cleaning up my casting!


Pin It

Wednesday, August 10, 2011

Drawn Out!

 TAFE: Weeks 21, 22 & 23.

Back at Tafe for Semester 2, we're 3 weeks in and for the first 2 weeks didn't touch a tool or a torch! Well that's unless you consider a pencil a tool!

We've been learning the practical aspects of design, particularly rendering jewellery designs with a little bit of tech drawing thrown in.

This may seem basic but it's been many years since my high school art, so it was new to me - first the basics of shading, light source etc

Then with coloured pencils

Later we learnt how to draw twisted wire and a chain


More drawing practise, this time learning the best colours to use for rendering in gold & silver then learning the tech methods of drawing a ring to scale.


Then the pencils were put away and at last some tools came out - hmmm, wax carving tools. And now for the piece that took a day and a half out of my life!!
The cord piece was the model and we had to carve a 3D model of the knot from a block of wax. I found this incredibly difficult and it was a great relief to finally finish it, having confirmed my suspicion that I'll never make the cut as a sculptor!


Pin It

Wednesday, April 13, 2011

Still going on that Nature Theme!

Week 7 & 8 !
I'm a bit tardy with these blog posts and the Tuesdays at TAFE are just slipping by so quickly.

I've still been working on the Nature theme assignment these past weeks. I've lined up and drilled all the holes and measured and cut the tubing to separate my metal layers and in the process was introduced to a new little tool - a tube cutting jig. Very handy little tool that is now on my wish list  (Ahem, note to my kids - Mother's Day coming up if you're reading this!)
Here's a pic of all the bits ready to be riveted together:


In between working on this we've done other tasks including an exercises in measuring and drilling and another sawing and piercing exercise. Funnily enough - I'm not finding these exercises tedious - they really are building up my skills so that these basic techniques become second nature. Hey, I even enjoy filing and sanding now! Pin It

Saturday, March 26, 2011

Design is evolving...

Week 6 - Etching has been a pain - tried to do it at home but the photocopy was 6 days old by then and it just wouldn't transfer the ink to the metal. I think a fresh photocopy is the go - then the toner should transfer all OK. For those that don't know - the transferred toner then acts as a resist. The raw metal will etch but anything covered by the toner is protected from the acid.
I wasted my day in class last Tuesday a bit, My middle aged brain I forgot to take my master pattern along - I could have made a fresh photocopy there if I had been prepared. Note to self: I will pack my school bag the night before, I will pack my school bag the night before..... It did give me time to finish my hollow form project from week 4 though, so all was not lost.
Today I played catch up at home. I successfully transferred my pattern and etched the text to the metal. Next up, I spent ages trying to work out how I'd add another layer to the design as the lecturer suggested,  but finally settled on an off centre tree. This fits in with my original design as the reverse of the backplate (text layer) is textured with a skeleton leaf imprint.


Bit more work to do on it yet, but I'm confidant that all will end well when it's all riveted together:) Pin It

Friday, March 25, 2011

Did you know I can't draw?

Week 5 - We got the written brief for our assignment. Luckily, the ideas I'd had fitted in all OK. The issue is drawing them - we're expected to present ideas and drawings in a visual diary. I had drawn a very rough sketch but I think I'll have to work on this side of things. Maybe that's why I gravitate to simple clean lines in my work - because give me a ruler and I can draw them! Not so easy for me if curves etc are involved.
Anyway here's my rather lame visual diary entry - definitely something to be improved upon in the coming weeks:
I was going to etch some text in my design (the dictionary definition of "Nature") and I'd drawn it all up in Publisher and printed it out.
Then I photocopied it on Acetate and reversed the design and copied it again to PNP transfer paper so the text was mirror image. This way when transferred to the metal the writing would read correctly. Bit of a rigmarole but I'd done this at home.

 I spent time in class sawing out my metal, and although I didn't get around to etching my piece, we did see an etching demo. We were shown foldforming too so I had a little play around with that in the afternoon.
Our lecturer talked to each of us about our designs and while she said my idea was good, she suggested adding another layer, perhaps partially covering the text to draw the viewer in and add more dimension.
Well this left me with lots to think about (and draw up!)during the following week. Pin It

Tafe on Tuesdays.

I love everything about Tuesdays now (oh, Ok with the exception of the Parking Ticket Machine at the Train Station that refuses to recognise my Smartrider card - but now is not the time for whinging about Transperth!)

I enjoy the train ride into the city even though I never get a seat and I enjoy the walk to TAFE through the city station, then up past the Museum & Art Gallery. But best of all I love 8.45am till 4pm when I'm in class.
Being a student after all these years is so much fun!

Week 4 - in the morning  we were shown how to file a strip of metal to mitre nice sharp corners in metal and form a square. Then we got busy on our own little square hollow form. I didn't finish, but did manage to get back to it and finished it in week six. Later we were shown cold connections and rivets and given a few practise exercises.
I added holes to add a chain and it will hang as a diamond shape. Hope to do another in silver with horizontal holes to hang as a square.
 Our homework was to think about a design project for an upcoming assignment  - The theme was "Nature" and the project was to design (yes, on paper - aargh help!) a piece using the skills we'd been practicing, such as sawing, filing, texturing, and cold connections..... but no soldering! Pin It

Wednesday, March 02, 2011

JAW Finished - TAFE Started instead :)

You may have noticed I haven't posted up any new creations for my Jewellery A Week Project (JAW). That's because I've abandoned it.
I started it to encourage myself to create to get out of a slump. Well now I don't feel the need to do that..... and the reason is.......I've gone back to Study :)

My friend Jane from Planet Lime encouraged me to join her in a course this year. So each Tuesday this year I will spend the day at TAFE completing a Certificate 2 in Jewellery Manufacture.  I've had three days at class so far, and we have started with the basics. (There are complete beginners in the course, as well as some with more experience and it's designed to prepare for apprenticeship or to go on to the Diploma Course).
I've spent the last three lessons, sawing, piercing and filing and I'm loving it. Even though I've been doing these things for several years, it's a very hands on course and some of the piercing and filing exercises are a lot more intricate than I'd normally do in my own pieces. I'm feeling challenged and loving it! I'm learning lots of new tips and techniques too, which is great.


Week one, we spent the morning sawing and piercing the whale from Brass sheet..

Afternoon, we spent filing  4 x 4mm square copper wire to form different shapes. All I'd ever done with a file over the years is to smooth edges of  hand sawn work, never anything like this! Definately felt like a beginner with this exercise.


Week two, Morning - Sawed  Brass, measured up and formed into a wide band and soldered and shaped into a ring, then filed, sanded etc.
Afternoon - Started with a 4 x 4mm square copper wire, formed, soldered and shaped into a ring and then filed this into triangular type profile.


Week 3 - Were introduced to the rolling mills, we'll be making out own wire and sheet for class projects. We practised on copper first, then we were given an approx 25mm x 6mm rod of sterling which we milled into a long rectangle, taking the piece to 5mm x  1.5mm thick. We measured and made up a plain ring band from the result. The workshop has about 5 (yes 5!) rolling mills. So, the second project was to work on while we were waiting for a mill, as there's 12 in the class. We cut brass, domed it, soldered it to sheet, sawed around the shape to remove the excess backing sheet, the aim being to not see the join when we've finished our clean up.
The picture below is of my Works in Progress. I still have finishing up to do on these.


This is giving everyone good grounding in sawing, piercing, filing & soldering as well as introduction to the various workshop tools and equipment.
Next week we'll be starting on some design work - Really look forward to Tuesdays these days  :) Pin It